How to Cook the Juiciest Beef Tenderloin
J. Kenji Lopez-Alt
Dec 10, 2025
How to Cook the Juiciest Beef Tenderloin
Dec 10, 2025
The video shown above this article was produced in partnership with Combustion Inc., makers of the Predictive Thermometer. I chose to partner with them because I’ve been following founder Chris Young’s work for over a decade, and I’ve been using the Predictive Thermometer since its introduction. I genuinely believe it’s a game-changing tool—the best thermometer on the market—and this experiment highlights exactly why. It allowed me to revisit my old slow-roasted beef tenderloin recipe and add real data showing what happens inside the meat as it cooks, and why the reverse-sear works as well as it does.
You can order the Predictive Thermometer here.

Growing up, prime rib was my family’s holiday roast. It’s got everything: the drama of a bone-in hunk of meat hitting the table (plus the bones for my sister to gnaw on), enough marbling to keep it juicy even if the cook prefers things on the medium side (or the thermometer in your family is not quite up to snuff), and flavor for days.
But I get why some folks prefer something leaner or more refined on the holiday table. Some don’t love the prominent fat seams in rib roast. Others want supreme tenderness above all else. That’s where tenderloin (or filet mignon, if you’re feeling fancy) comes in. It comes from inside the rib cage—an area of the animal that does very little work—so it’s virtually free of connective tissue and fat.
But for all that tenderness, tenderloin is one of the most unforgiving cuts to cook. Because of the lack of fat, even slight overcooking turns it dry, mealy, and sometimes even livery. The margin between perfection and disappointment can be measured in single degrees.
So how do we ensure the absolute juiciest, most evenly cooked tenderloin, with an interior that’s deep rosy pink from edge to center and a dark, flavorful crust? Once again, we turn to an old friend: the reverse sear. It’s a technique I first developed while working as a test cook at America’s Test Kitchen in 2006, and one I’ve turned to ever since for virtually all large-format roasts and steaks. It flips the traditional script by slow-cooking the meat first, then searing it hard only at the end.
Now, with the Predictive Thermometer, we can see exactly what’s going on inside the roast as it cooks and demonstrate why the technique works.
The Tender Trap: Why This Cut is so Tricky
I ran a simple experiment: two tenderloins, side by side. Same starting temperature, same trimming and tying job, same seasoning. One was cooked the traditional way: a hot pan sear followed by a hot oven. The other was reverse-seared: slow roast first, high heat only at the end. I inserted a Predictive Thermometer probe into each and recorded the temperature at every sensor throughout the cook.
Before looking at the data, a quick reminder of what tenderloin feels like at different temperatures:
• 120°F (49°C) – Rare
Deep red, extremely juicy, just beginning to firm up. Silky and tender, not mushy.
• 125–130°F (52–54°C) – Medium-Rare
Rosy pink, still very juicy, firmer but still tender. This is the money zone.
• 135–145°F (57–62°C) – Medium to Medium-Well
Pink transitioning to gray. Noticeably less juicy. A chalky, slightly granular texture begins to creep in.
Above 150°F (66°C) – Well Done and Beyond
Fully gray and mealy. Livery notes. Not what you want. (At least not what I want. You do you.)
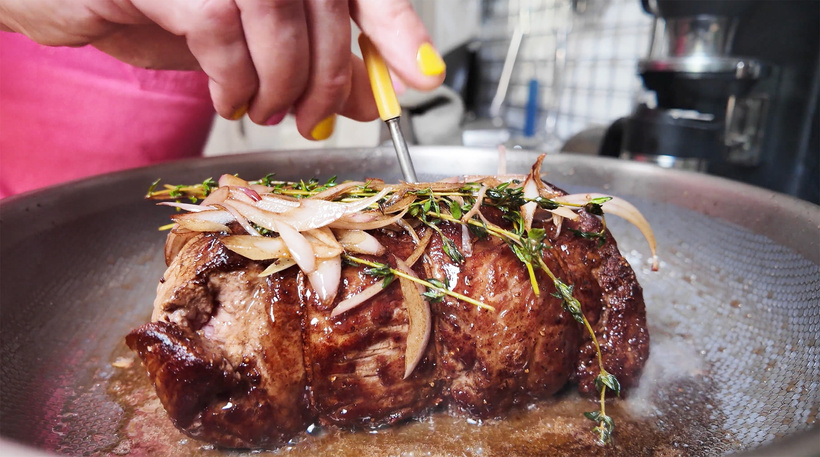
For the traditional tenderloin, I tied, seasoned, and rested it overnight in the fridge (a process called dry-brining, which encourages even seasoning and a drier surface for searing). The next day I seared it in a hot pan with butter, thyme, and shallots, then transferred it to a rack set in a rimmed baking sheet and popped it into a hot oven, taking it out when it hit 120°F in the center.
Here’s what it looked like after carving:
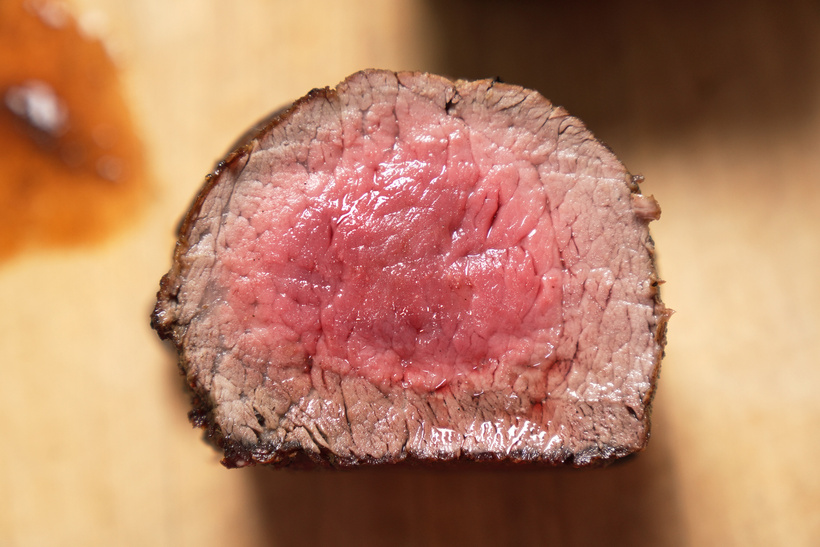
Perfectly cooked in the very center, but with a clear gradient that fades to drab gray at the edges.
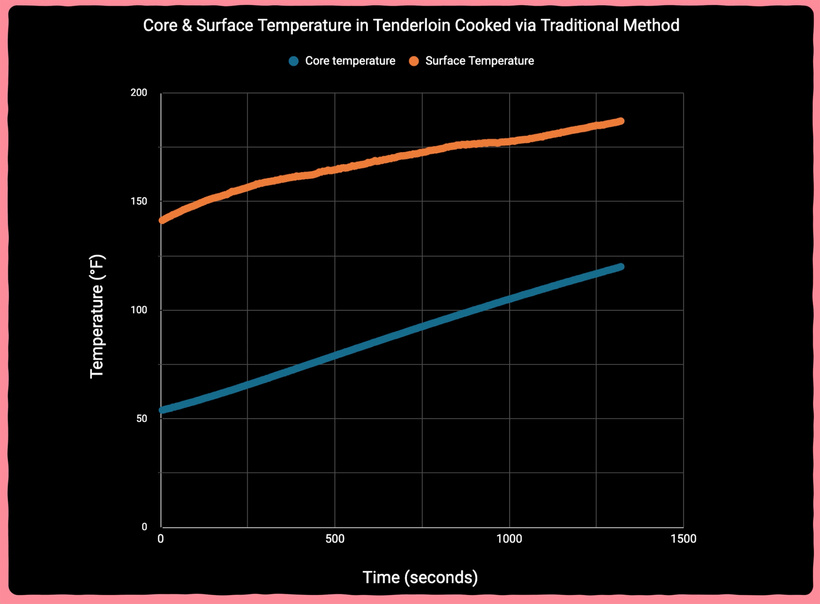
Using the Predictive Thermometer’s multi-sensor readouts, I compared the core temperature against the surface and subsurface temperatures as it cooked. By the time I pulled the roast from the oven at 120°F (carryover would take it to a perfect 125°F medium-rare), the outer layers had hit over 180°F.
That’s “congrats, you just paid $150 for something with the texture of canned tuna” territory.
(You can see the graph in the video above.)
And you could taste it. The center was gorgeous—juicy, red, silky. But moving outward, the meat became progressively drier and chalkier until the outer half-inch was gray, fibrous, and mealy.
But here’s the thing: it isn’t the tenderloin’s fault. It’s the method.
Reverse Sear: When They go High, We Go Low
For the reverse-seared tenderloin, I repeated the same prep—tie, season, overnight rest—then roasted it at 250°F, as low as my home oven could reliably maintain, until the center reached 120°F. I finished it with a quick stovetop sear in browned butter with shallots and thyme.
This time, when the core hit 120°F, the outer layers were sitting comfortably around 133°F—still well within medium-rare territory. Not 180°F. Not 150°F. Just a gentle, even temperature gradient.
When I sliced into it, the difference was immediate: no gray band, no dry edges, just a perfectly even rosy pink from edge to center. The entire roast was in the ideal juiciness zone.
The Predictive Thermometer didn’t just confirm that reverse searing works. It showed us why it works.
Brine and Dandy
Before either roast hit the heat, I seasoned them heavily with salt and left them uncovered overnight. This predates any fancy new thermometers and it's called dry-brining. Salt dissolves on the surface, works its way inward, and denatures proteins like myosin, reducing moisture loss. It also dries the exterior, which is crucial for rapid browning. (This is why reverse-seared meat browns faster than sous-vide meat. Sous-vide cooking leaves the surface damp; a slow roast dries it.)
Lean meat also benefits enormously from added fat, so I sear tenderloin in browned butter with shallots and thyme. This is less about basting moisture into the meat—it won’t penetrate—and more about creating an aromatic, flavorful medium that sticks to the crust and accelerates browning: Browning a reverse-seared tenderloin is measured in seconds, not minutes.
One last thing before we carve: tenderloin’s leanness doesn’t just affect how it cooks—it also shapes how I like to serve it. Because the meat is so mild and tender, it really benefits from something sharp, creamy, and assertive alongside it, which is why I almost always pair it with a simple horseradish cream. Crème fraîche gives it richness and tang, the horseradish adds heat without overwhelming the beef, and the chives bring a little green freshness. It’s the kind of sauce that takes almost no time to make but delivers exactly what tenderloin needs: contrast. A fatty cut like ribeye brings its own swagger; tenderloin needs a co-star. Horseradish cream balances simplicity with flavor.
Tenderloin is expensive. It’s special-occasion food. It deserves a method that respects what it is instead of fighting against it. And I can say with confidence: Reverse searing is my favorite way to do it (and this time I've got the thermometer to prove it).
Recipe: Slow-Roasted Reverse-Sear Beef Tenderloin (with Horseradish Cream)
Every recipe I publish here is personally tested, tasted, and approved.
Beef tenderloin is one of the most luxurious—and most unforgiving—cuts you can put on the table. With almost no fat to cushion it, even slight overcooking can turn this pricey roast dry, chalky, and livery. This updated version of my classic recipe uses slow roasting, dry brining, and a final butter sear to produce edge-to-edge rosy medium-rare every time.
For this round, I cooked parallel roasts—one traditionally (hot sear → hot oven), one using the reverse sear—while logging internal temperatures with a Predictive Thermometer. The results showed exactly why the method works: when the center hit 120°F, the traditional roast’s exterior had skyrocketed to 180°F, while the reverse-seared roast’s surface topped out at just 133°F. Less gradient means more tenderness, juiciness, and usable meat.
If you’re investing in a whole tenderloin for a holiday or special dinner, this is the method that respects the cut.
What I love about this recipe:
Edge-to-edge medium rare with almost no overcooked gray band
Dry brine + low, slow heat dramatically reduce moisture loss
Fast, flavorful crust from a butter/shallot/thyme sear
Predictive Thermometer–validated—the data backs up the result
Yield: 6 to 8 servings
Active Time: 30 minutes
Total Time: 12–24 hours (including overnight rest)
Notes: Reverse sear ensures even doneness; a Predictive Thermometer improves accuracy
Tenderloin Texture by Internal Temperature
120°F – deep red, extremely juicy, just beginning to firm
125–130°F – rosy pink, still juicy; ideal for tenderloin
135–145°F – juices drop sharply; texture becomes chalky
150°F+ – gray, mealy, livery; not recommended
Ingredients
For the Tenderloin
1 whole beef tenderloin, trimmed and tied, 3-4 pounds
Kosher salt
Freshly ground black pepper
Optional: a pinch of MSG (about 1 part MSG to 8 parts salt)
For Finishing
2 tablespoons (45g) unsalted butter
1 shallot, thinly sliced
4 sprigs fresh thyme
Coarse sea salt (Maldon, fleur de sel), for serving
Minced chives or picked thyme leaves, for serving
Olive oil, for finishing
For the Horseradish Cream
½ cup crème fraîche
2–3 tablespoons prepared horseradish (or freshly grated + splash of vinegar)
1 tablespoon minced chives
Kosher salt and freshly ground black pepper
Small pinch MSG (optional)
Method
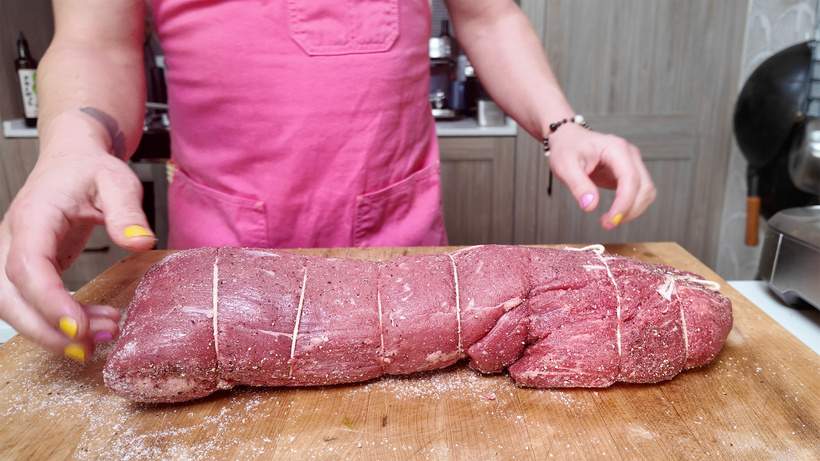
Tie the tenderloin at 1-inch intervals with butcher’s twine, then season generously on all sides with kosher salt, black pepper, and optional MSG. Place it on a wire rack set in a rimmed baking sheet and refrigerate uncovered for 12 to 48 hours to dry the surface and allow the salt to penetrate.
When ready to cook, heat the oven to 250°F (or as low as your oven can reliably maintain). Insert a probe thermometer into the thickest part of the roast. Transfer the tenderloin to the oven and cook until the center reaches 118–120°F, about 1½ to 2½ hours depending on size. The Predictive Thermometer will give you a precise estimate of cooking time as it roasts.
While the roast finishes, make the horseradish cream by mixing crème fraîche, horseradish, chives, salt, pepper, and optionally a pinch of MSG. Refrigerate until serving.
Melt the butter in a large skillet over high heat until it turns lightly brown and nutty, then add the sliced shallot and thyme. Add the tenderloin and sear it quickly on all sides, moving it frequently and basting with the aromatic butter. With a dry, slow-roasted surface, browning happens in seconds.
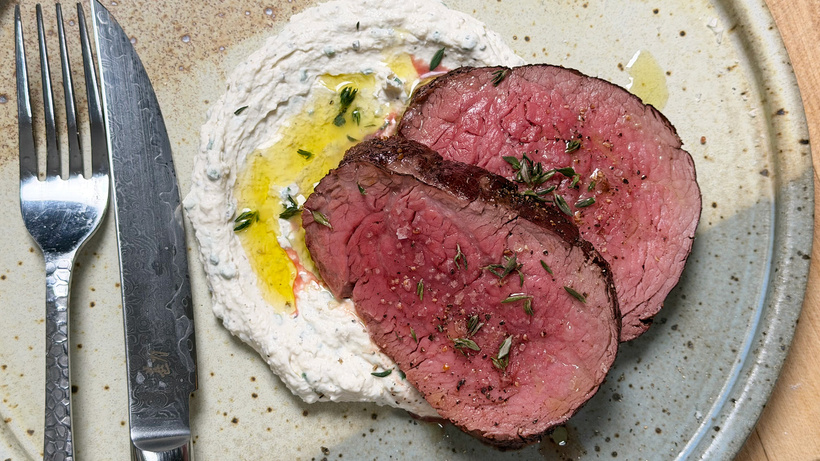
Transfer the tenderloin to a cutting board, snip away the twine, and slice into ½-inch medallions. Finish with coarse sea salt, chives, and a drizzle of olive oil. Serve with horseradish cream.
How to Cook the Juiciest Beef Tenderloin
J. Kenji Lopez-Alt
Dec 10, 2025
How to Cook the Juiciest Beef Tenderloin
Dec 10, 2025
The video shown above this article was produced in partnership with Combustion Inc., makers of the Predictive Thermometer. I chose to partner with them because I’ve been following founder Chris Young’s work for over a decade, and I’ve been using the Predictive Thermometer since its introduction. I genuinely believe it’s a game-changing tool—the best thermometer on the market—and this experiment highlights exactly why. It allowed me to revisit my old slow-roasted beef tenderloin recipe and add real data showing what happens inside the meat as it cooks, and why the reverse-sear works as well as it does.
You can order the Predictive Thermometer here.
Growing up, prime rib was my family’s holiday roast. It’s got everything: the drama of a bone-in hunk of meat hitting the table (plus the bones for my sister to gnaw on), enough marbling to keep it juicy even if the cook prefers things on the medium side (or the thermometer in your family is not quite up to snuff), and flavor for days.
But I get why some folks prefer something leaner or more refined on the holiday table. Some don’t love the prominent fat seams in rib roast. Others want supreme tenderness above all else. That’s where tenderloin (or filet mignon, if you’re feeling fancy) comes in. It comes from inside the rib cage—an area of the animal that does very little work—so it’s virtually free of connective tissue and fat.
But for all that tenderness, tenderloin is one of the most unforgiving cuts to cook. Because of the lack of fat, even slight overcooking turns it dry, mealy, and sometimes even livery. The margin between perfection and disappointment can be measured in single degrees.
So how do we ensure the absolute juiciest, most evenly cooked tenderloin, with an interior that’s deep rosy pink from edge to center and a dark, flavorful crust? Once again, we turn to an old friend: the reverse sear. It’s a technique I first developed while working as a test cook at America’s Test Kitchen in 2006, and one I’ve turned to ever since for virtually all large-format roasts and steaks. It flips the traditional script by slow-cooking the meat first, then searing it hard only at the end.
Now, with the Predictive Thermometer, we can see exactly what’s going on inside the roast as it cooks and demonstrate why the technique works.
The Tender Trap: Why This Cut is so Tricky
I ran a simple experiment: two tenderloins, side by side. Same starting temperature, same trimming and tying job, same seasoning. One was cooked the traditional way: a hot pan sear followed by a hot oven. The other was reverse-seared: slow roast first, high heat only at the end. I inserted a Predictive Thermometer probe into each and recorded the temperature at every sensor throughout the cook.
Before looking at the data, a quick reminder of what tenderloin feels like at different temperatures:
• 120°F (49°C) – Rare
Deep red, extremely juicy, just beginning to firm up. Silky and tender, not mushy.
• 125–130°F (52–54°C) – Medium-Rare
Rosy pink, still very juicy, firmer but still tender. This is the money zone.
• 135–145°F (57–62°C) – Medium to Medium-Well
Pink transitioning to gray. Noticeably less juicy. A chalky, slightly granular texture begins to creep in.
Above 150°F (66°C) – Well Done and Beyond
Fully gray and mealy. Livery notes. Not what you want. (At least not what I want. You do you.)
For the traditional tenderloin, I tied, seasoned, and rested it overnight in the fridge (a process called dry-brining, which encourages even seasoning and a drier surface for searing). The next day I seared it in a hot pan with butter, thyme, and shallots, then transferred it to a rack set in a rimmed baking sheet and popped it into a hot oven, taking it out when it hit 120°F in the center.
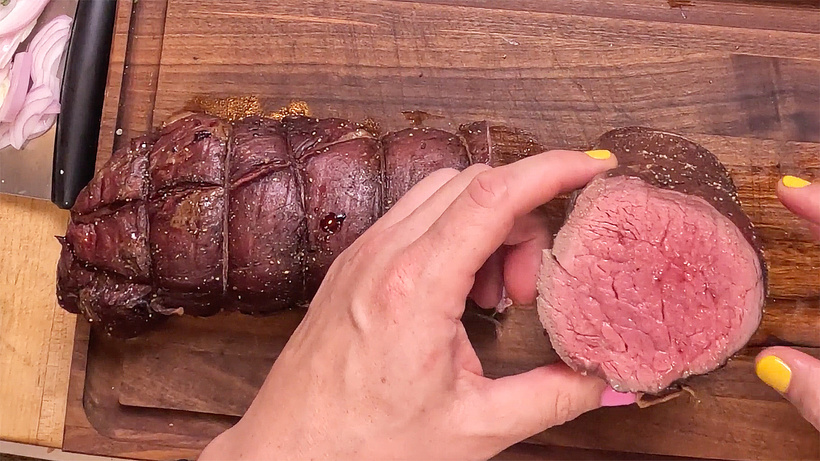
Here’s what it looked like after carving:
Perfectly cooked in the very center, but with a clear gradient that fades to drab gray at the edges.
Using the Predictive Thermometer’s multi-sensor readouts, I compared the core temperature against the surface and subsurface temperatures as it cooked. By the time I pulled the roast from the oven at 120°F (carryover would take it to a perfect 125°F medium-rare), the outer layers had hit over 180°F.
That’s “congrats, you just paid $150 for something with the texture of canned tuna” territory.
(You can see the graph in the video above.)
And you could taste it. The center was gorgeous—juicy, red, silky. But moving outward, the meat became progressively drier and chalkier until the outer half-inch was gray, fibrous, and mealy.
But here’s the thing: it isn’t the tenderloin’s fault. It’s the method.
Reverse Sear: When They go High, We Go Low
For the reverse-seared tenderloin, I repeated the same prep—tie, season, overnight rest—then roasted it at 250°F, as low as my home oven could reliably maintain, until the center reached 120°F. I finished it with a quick stovetop sear in browned butter with shallots and thyme.
This time, when the core hit 120°F, the outer layers were sitting comfortably around 133°F—still well within medium-rare territory. Not 180°F. Not 150°F. Just a gentle, even temperature gradient.
When I sliced into it, the difference was immediate: no gray band, no dry edges, just a perfectly even rosy pink from edge to center. The entire roast was in the ideal juiciness zone.
The Predictive Thermometer didn’t just confirm that reverse searing works. It showed us why it works.
Brine and Dandy
Before either roast hit the heat, I seasoned them heavily with salt and left them uncovered overnight. This predates any fancy new thermometers and it's called dry-brining. Salt dissolves on the surface, works its way inward, and denatures proteins like myosin, reducing moisture loss. It also dries the exterior, which is crucial for rapid browning. (This is why reverse-seared meat browns faster than sous-vide meat. Sous-vide cooking leaves the surface damp; a slow roast dries it.)
Lean meat also benefits enormously from added fat, so I sear tenderloin in browned butter with shallots and thyme. This is less about basting moisture into the meat—it won’t penetrate—and more about creating an aromatic, flavorful medium that sticks to the crust and accelerates browning: Browning a reverse-seared tenderloin is measured in seconds, not minutes.
One last thing before we carve: tenderloin’s leanness doesn’t just affect how it cooks—it also shapes how I like to serve it. Because the meat is so mild and tender, it really benefits from something sharp, creamy, and assertive alongside it, which is why I almost always pair it with a simple horseradish cream. Crème fraîche gives it richness and tang, the horseradish adds heat without overwhelming the beef, and the chives bring a little green freshness. It’s the kind of sauce that takes almost no time to make but delivers exactly what tenderloin needs: contrast. A fatty cut like ribeye brings its own swagger; tenderloin needs a co-star. Horseradish cream balances simplicity with flavor.
Tenderloin is expensive. It’s special-occasion food. It deserves a method that respects what it is instead of fighting against it. And I can say with confidence: Reverse searing is my favorite way to do it (and this time I've got the thermometer to prove it).
Recipe: Slow-Roasted Reverse-Sear Beef Tenderloin (with Horseradish Cream)
Every recipe I publish here is personally tested, tasted, and approved.
Beef tenderloin is one of the most luxurious—and most unforgiving—cuts you can put on the table. With almost no fat to cushion it, even slight overcooking can turn this pricey roast dry, chalky, and livery. This updated version of my classic recipe uses slow roasting, dry brining, and a final butter sear to produce edge-to-edge rosy medium-rare every time.
For this round, I cooked parallel roasts—one traditionally (hot sear → hot oven), one using the reverse sear—while logging internal temperatures with a Predictive Thermometer. The results showed exactly why the method works: when the center hit 120°F, the traditional roast’s exterior had skyrocketed to 180°F, while the reverse-seared roast’s surface topped out at just 133°F. Less gradient means more tenderness, juiciness, and usable meat.
If you’re investing in a whole tenderloin for a holiday or special dinner, this is the method that respects the cut.
What I love about this recipe:
Edge-to-edge medium rare with almost no overcooked gray band
Dry brine + low, slow heat dramatically reduce moisture loss
Fast, flavorful crust from a butter/shallot/thyme sear
Predictive Thermometer–validated—the data backs up the result
Yield: 6 to 8 servings
Active Time: 30 minutes
Total Time: 12–24 hours (including overnight rest)
Notes: Reverse sear ensures even doneness; a Predictive Thermometer improves accuracy
Tenderloin Texture by Internal Temperature
120°F – deep red, extremely juicy, just beginning to firm
125–130°F – rosy pink, still juicy; ideal for tenderloin
135–145°F – juices drop sharply; texture becomes chalky
150°F+ – gray, mealy, livery; not recommended
Ingredients
For the Tenderloin
1 whole beef tenderloin, trimmed and tied, 3-4 pounds
Kosher salt
Freshly ground black pepper
Optional: a pinch of MSG (about 1 part MSG to 8 parts salt)
For Finishing
2 tablespoons (45g) unsalted butter
1 shallot, thinly sliced
4 sprigs fresh thyme
Coarse sea salt (Maldon, fleur de sel), for serving
Minced chives or picked thyme leaves, for serving
Olive oil, for finishing
For the Horseradish Cream
½ cup crème fraîche
2–3 tablespoons prepared horseradish (or freshly grated + splash of vinegar)
1 tablespoon minced chives
Kosher salt and freshly ground black pepper
Small pinch MSG (optional)
Method
Tie the tenderloin at 1-inch intervals with butcher’s twine, then season generously on all sides with kosher salt, black pepper, and optional MSG. Place it on a wire rack set in a rimmed baking sheet and refrigerate uncovered for 12 to 48 hours to dry the surface and allow the salt to penetrate.
When ready to cook, heat the oven to 250°F (or as low as your oven can reliably maintain). Insert a probe thermometer into the thickest part of the roast. Transfer the tenderloin to the oven and cook until the center reaches 118–120°F, about 1½ to 2½ hours depending on size. The Predictive Thermometer will give you a precise estimate of cooking time as it roasts.
While the roast finishes, make the horseradish cream by mixing crème fraîche, horseradish, chives, salt, pepper, and optionally a pinch of MSG. Refrigerate until serving.
Melt the butter in a large skillet over high heat until it turns lightly brown and nutty, then add the sliced shallot and thyme. Add the tenderloin and sear it quickly on all sides, moving it frequently and basting with the aromatic butter. With a dry, slow-roasted surface, browning happens in seconds.
Transfer the tenderloin to a cutting board, snip away the twine, and slice into ½-inch medallions. Finish with coarse sea salt, chives, and a drizzle of olive oil. Serve with horseradish cream.